Did you know that applying a standard silicone sealant to an acrylic window pane is often the quickest way to guarantee a structural failure? It’s a common mistake that leads to costly damage, yet the distinction between bonding a pane and sealing a frame remains one of the most misunderstood areas of vehicle maintenance. We recognise the frustration of identifying a leak only to be met with a confusing array of caravan window seal adhesive options, especially when you’re worried about using a product that might cause the plastic to crack or craze.
By reading this guide, you’ll master the technical differences between structural bonding and weatherproofing to ensure a professional watertight repair. We’ll clarify exactly which products are required for your specific task, whether you’re dealing with delamination or perimeter sealing. We will move through the essential material properties, chemical compatibility requirements, and the latest application techniques to help you achieve a result that lasts for years, giving you total confidence in the integrity of your caravan.
Key Takeaways
- Learn to distinguish between structural window delamination and perimeter seal leaks to ensure you select the correct repair method.
- Identify the specific caravan window seal adhesive required for bonding acrylic panes, including the use of solvent cements that weld the materials together for a permanent fix.
- Understand why polyurethane sealants are the preferred choice for weatherproofing rubber trims and frames against the caravan body.
- Match your adhesive selection to the specific material properties of your window components, such as ABS or Perspex, to prevent chemical cracking.
- Master professional application techniques that focus on meticulous surface preparation and the prevention of air bubbles during the bonding process.
p>If you require specific technical advice regarding your window repair project, please get in touch with our specialist team for guidance on product selection.
Identifying Caravan Window Repair Needs
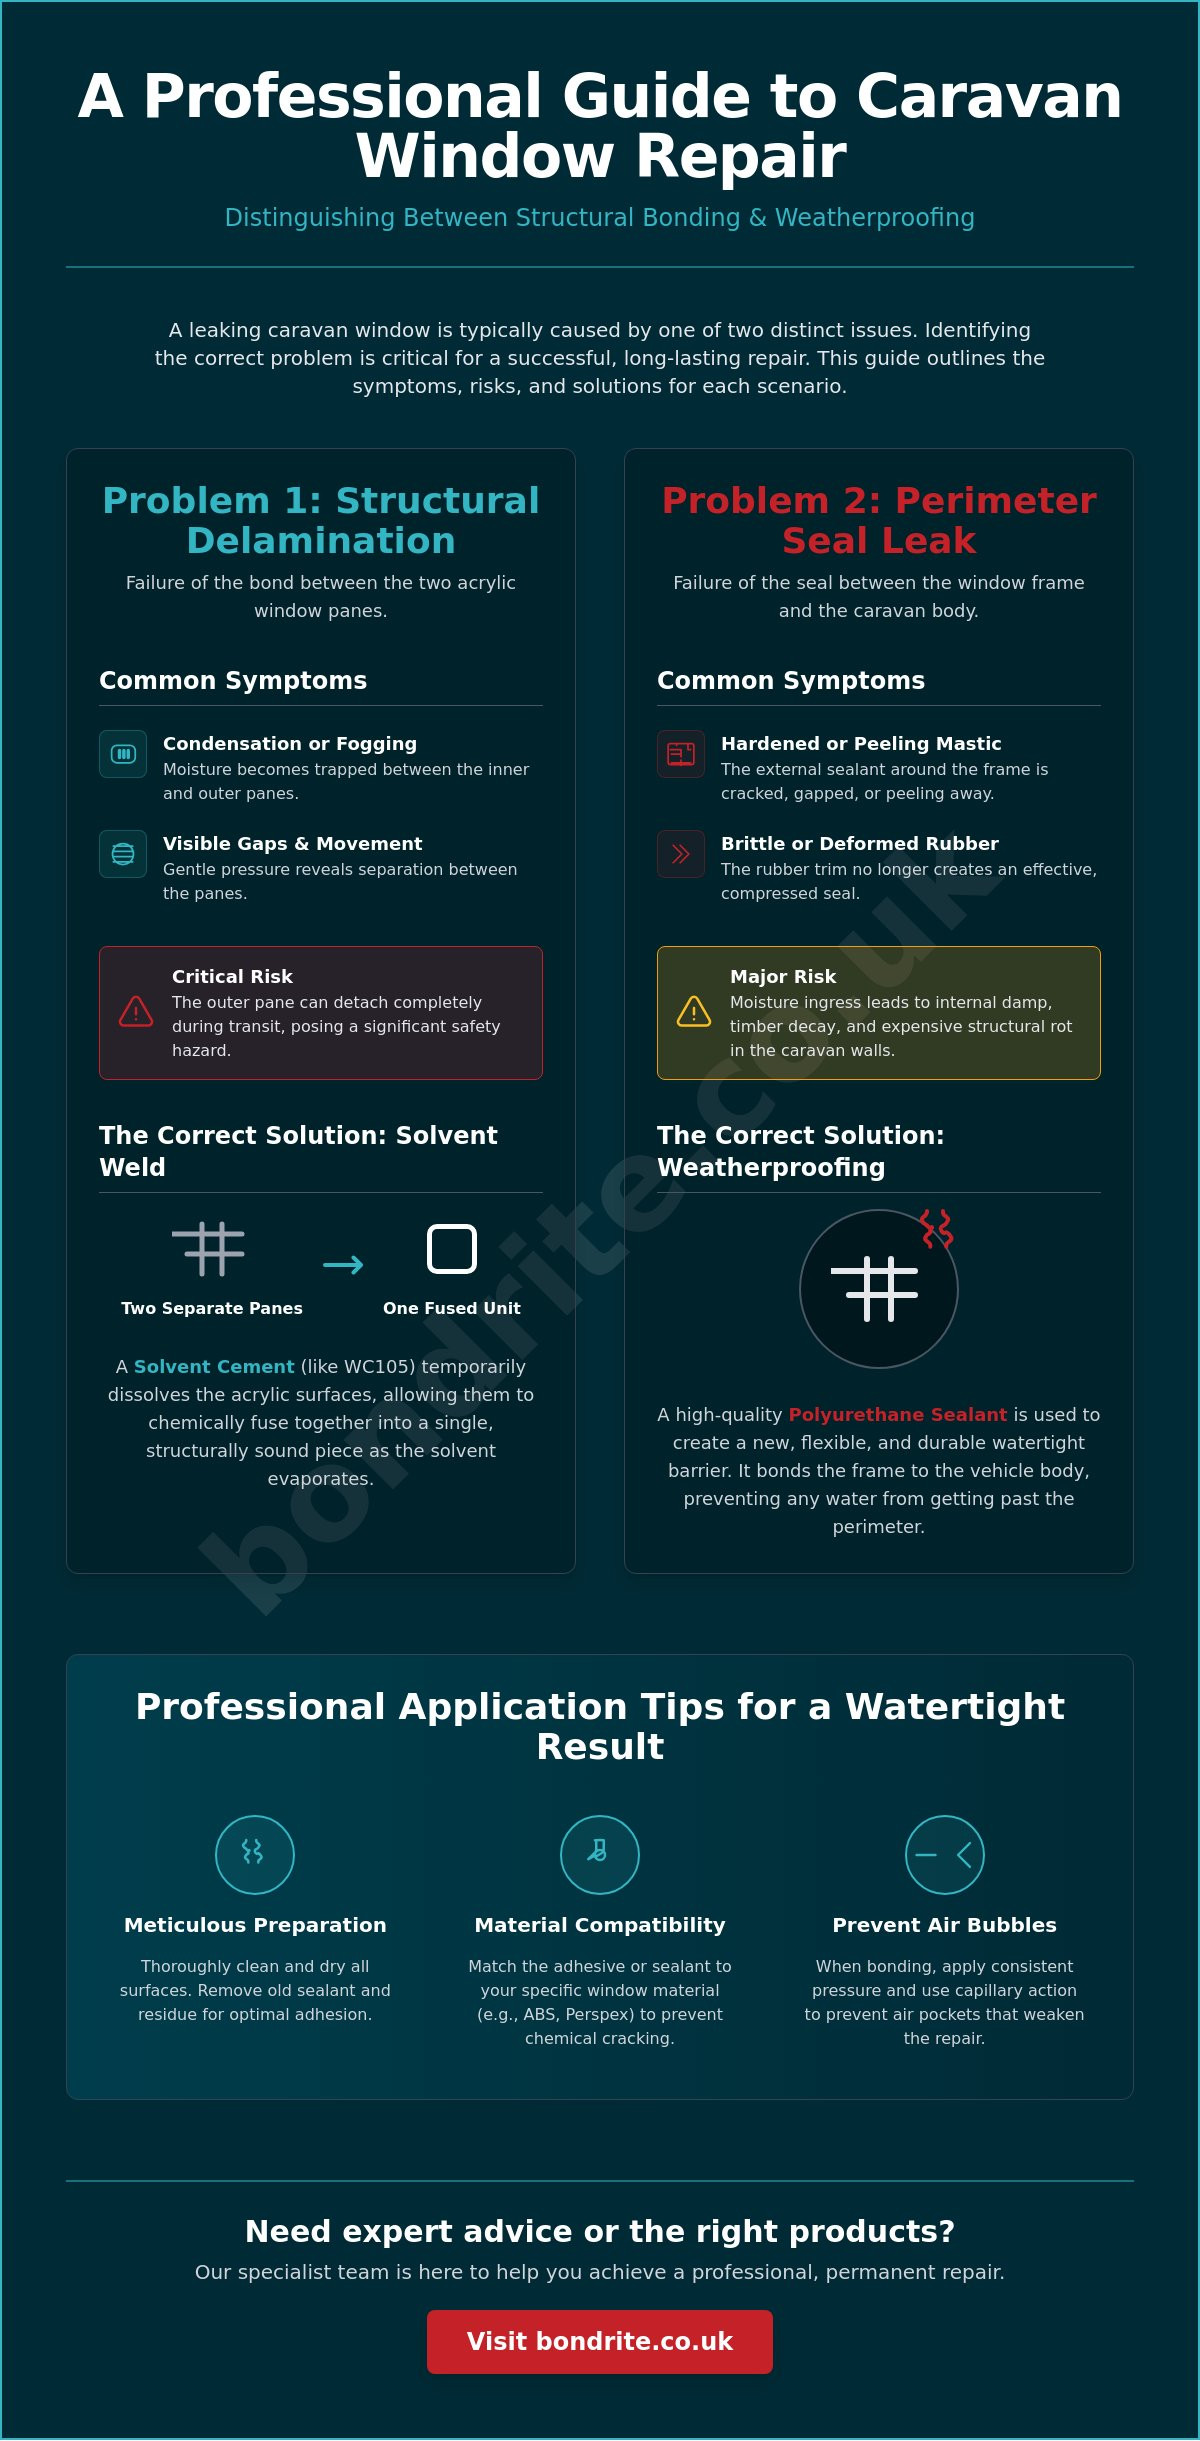
Understanding the root cause of a leak is the first step in selecting the correct caravan window seal adhesive. You must distinguish between a structural failure within the window pane itself and a failure of the perimeter seal. A structural failure typically involves delamination, where the two halves of a double glazed acrylic unit separate. Conversely, a perimeter leak occurs when the sealant technology used to bond the frame to the vehicle body degrades or the rubber trim loses its elasticity.
Addressing these issues early is vital to prevent internal wall panel rot. Moisture ingress often starts as a minor damp patch but can quickly lead to widespread timber decay if left unchecked. You should look for hairline cracks around the window stays and hinges, as these often indicate stress points that could evolve into deep structural fractures. If you notice any discolouration or a soft feel to the interior wallboard, the seal has likely been compromised for some time.
To better understand the physical signs of seal degradation, watch this helpful video:
Diagnosing Window Delamination
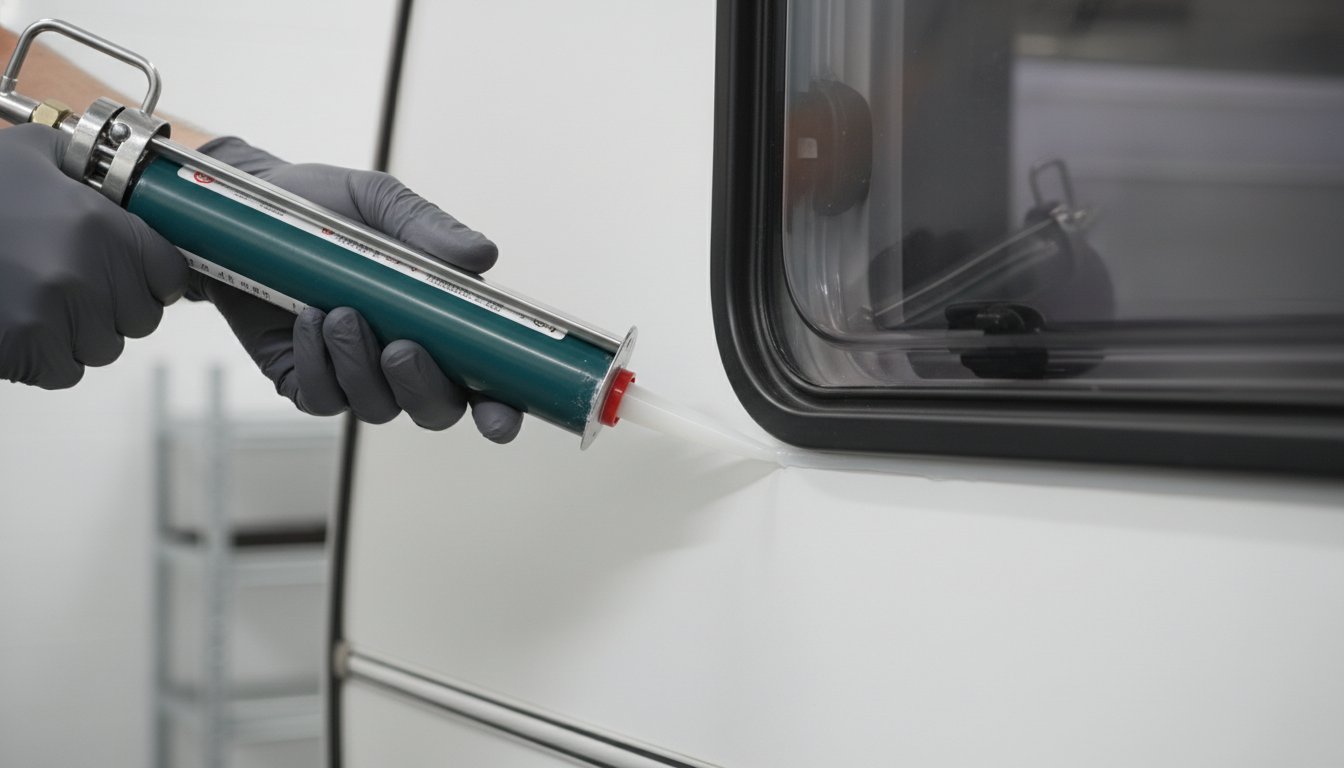
Modern caravan windows are usually constructed from two acrylic panes bonded together. Over time, UV exposure and thermal expansion cause this bond to fail. You’ll often see condensation or fogging between the panes, which is a clear indicator of seal failure. To confirm delamination, apply gentle outward pressure to the window edge whilst it is closed. If any movement or a visible gap appears between the inner and outer pane, a structural repair with caravan repair adhesives is necessary to restore the unit’s integrity.
Perimeter Seal and Rubber Trim Issues
If the window panes are secure but water is still entering the vehicle, the fault likely lies with the frame sealant or the rubber trim. Inspect the mastic or silicone around the external frame for signs of hardening, peeling, or gaps. Check the integrity of the rubber bulb seal whilst the window is closed to ensure it compresses evenly against the aperture. If the rubber has become brittle or permanently deformed, you must replace the seal entirely. Attempting to re-seal a perished trim is rarely successful, as a compromised material cannot provide a reliable watertight barrier.
For more information on the chemical properties of our bonding agents or to request a technical data sheet, please contact our specialist technical department for assistance.
Adhesives for Window Delamination and Cracks
When you are repairing a delaminated window, you aren’t simply applying a layer of glue to a surface. You are performing a solvent weld. Unlike standard adhesives that sit on top of a material, a high quality caravan window seal adhesive such as WC105 Water Clear Solvent Cement works by temporarily dissolving the surface of the acrylic. This process allows the polymer chains of the two separate panes to intermingle. Once the solvent evaporates, the two pieces become a single, homogenous unit. This chemical fusion is essential for maintaining the structural integrity of the window during transit.
The integrity of this bond is a critical safety consideration. Whilst domestic caravans aren’t subject to the same strictures as heavy commercial vehicles under the Federal Motor Vehicle Safety Standard 212, the principle of window retention remains vital. A failed bond can lead to a pane detaching entirely at motorway speeds. Using a clear drying solvent cement ensures that the repair is not only structurally sound but also aesthetically invisible, preserving the clarity of your caravan windows.
Choosing Between Medium and High Viscosity Solutions
Selecting the correct viscosity is a matter of practical application. WC105 Water Clear Solvent Cement is a favourite for standard delamination because its medium viscosity allows it to fill small gaps whilst remaining easy to control. If you are dealing with a full delamination where the panes have completely separated, you may require a variant with a longer working time. These extended cure adhesives allow you to align large panes precisely before the solvent begins to set. Most solvent welds will reach significant handling strength within three hours, though a full cure typically requires twenty four hours in a dry environment.
Repairing Surface Cracks and Star Fractures
For hairline cracks and star fractures, a very thin, water-like solvent cement is the most effective solution. These low-viscosity liquids use capillary action to pull themselves deep into the fracture, sealing the crack from the inside out and preventing it from spreading further across the pane. Before you apply any adhesive, it is imperative to clean the area thoroughly with Isopropanol (IPA). Any grease or road film trapped within the crack will prevent the solvent from reacting correctly with the plastic. Solvent welding is superior to surface gluing because it creates a permanent molecular bond rather than a temporary surface attachment. If you are unsure which viscosity is best suited for your specific crack pattern, consult with our technical team for a specific product recommendation.
If you require technical assistance in choosing between a structural adhesive and a flexible perimeter sealant, please reach out to our expert advisors for a professional recommendation.
Sealants for Rubber Window Trims and Seals
Whilst the previous section addressed the molecular fusion of acrylic panes, the perimeter of the window assembly requires a different chemical approach. Choosing a caravan window seal adhesive for the frame or rubber trim involves balancing structural support with environmental resistance. Unlike solvent cements, which are rigid once cured, perimeter sealants must remain flexible to accommodate the thermal expansion of the caravan body panels and the mechanical stresses encountered whilst towing. Selecting the right caravan window seal adhesive for perimeter work ensures that the joint can flex without losing its watertight integrity.
Polyurethane adhesives are the industrial standard for bonding window frames to the vehicle skin. They provide a high modulus bond that supports the weight of the window assembly whilst offering exceptional resistance to vibration. If you are working on a modern composite or aluminium caravan body, polyurethane ensures the frame stays fixed despite the constant movement of the chassis. You must ensure that any product you select specifies high UV resistance. Without this, the polymer chains will degrade under direct sunlight, leading to shrinkage and eventually the return of water ingress. This degradation often manifests as a chalky residue or visible cracks in the sealant bead.
Polyurethane and Silicone Options
If you require a flexible watertight barrier that is easier to remove during future maintenance, silicone sealants are a viable alternative. However, you must distinguish between low modulus and high modulus options. High modulus sealants are stiffer and provide more structural support, whereas low modulus variants offer greater movement capability. You can view our full range of sealants and silicones to find the specific chemistry required for your frame material. Always check for an acid-free or neutral cure formulation to avoid damaging sensitive caravan components.
Mastic and Bedding Compounds
Non setting bedding mastics are specifically designed for the rubber seals that sit between the window and the caravan aperture. These compounds never fully harden, which allows them to maintain a seal even as the caravan twists and flexes on the road. When applying these mastics, you should aim for a consistent, continuous bead behind the rubber trim. Because they remain tacky, they provide a self-healing property where minor movements do not break the watertight bond. This makes them a favourite amongst professional repairers for older vehicles where the aperture may no longer be perfectly square and requires a more forgiving sealant layer.
If you require specific technical advice regarding the compatibility of your repair materials, please contact our specialist team for a professional consultation.
A Framework for Selecting Your Repair Materials
To achieve a professional standard repair, you must move beyond anecdotal advice and follow a technical framework based on material science. Selecting the wrong caravan window seal adhesive isn’t just a waste of resources; it can lead to irreversible substrate damage. You must first identify the specific plastic used in your window assembly. Whilst most modern panes are acrylic, many window surrounds and trims are manufactured from ABS or other thermoplastics. Each material reacts differently to chemical solvents and adhesives, meaning a universal approach is rarely successful.
Gap evaluation is the next critical step in the selection process. If you’re bonding two flat surfaces with minimal clearance, a low viscosity adhesive is required to ensure even coverage via capillary action. Conversely, if you’re sealing a perimeter frame where gaps may be uneven or wider than 2mm, a high viscosity or thixotropic sealant is necessary. These thicker materials bridge voids without slumping before the cure is complete. You must also determine the requirement for permanence. Structural solvent welds create a non-reversible chemical bond, whereas certain bedding mastics are designed to stay tacky. This allows for the future removal and replacement of the rubber trim without damaging the vehicle skin.
Material Compatibility Checklist
Acrylic and Polyplastic windows are highly susceptible to stress cracking, often referred to as crazing, if they come into contact with incompatible chemicals. You must use specific solvent cements that are formulated for these materials to maintain structural integrity. Consider the following material requirements before starting your repair.
- Acrylic panes require specific solvent cements to avoid chemical crazing and ensure optical clarity.
- ABS surrounds need high tack adhesives that bond effectively to low energy plastics.
- EPDM rubber seals must be paired with non-degrading bedding mastics to prevent the elastomer from perishing.
For a comprehensive selection of compatible products, refer to our dedicated range of caravan repair adhesives.
Environmental and Performance Factors
The bond between a window and the caravan bodywork is subject to significant thermal expansion. In the UK, surface temperatures on a caravan skin can fluctuate by over 40 degrees Celsius between a winter night and a summer afternoon. Your chosen caravan window seal adhesive must possess enough elasticity to absorb this movement without shearing the bond line. Vibration resistance is equally critical for mobile applications. A caravan in motion is subject to constant mechanical shock and high frequency vibration from the road surface. A brittle adhesive will eventually fatigue and fail under these loads. Selecting a product that maintains its performance and flexibility amongst these varying conditions is the only way to ensure a long term, professional watertight result.
If you’re uncertain about the material composition of your window unit or the specific gap filling requirements of your project, speak with our technical advisors for a confirmed compatibility check.
If you require specific guidance on application tools or surface cleaners, please contact our technical department for expert advice regarding your repair project.
Professional Application Tips for a Watertight Result
Achieving a professional finish with your chosen caravan window seal adhesive depends entirely on the precision of your execution. Even the highest specification chemical bond will fail if the substrate is contaminated or the application is rushed. You must approach the repair with a methodical mindset, ensuring each stage of the process is completed before moving to the next. Precision is the difference between a temporary fix and a permanent, watertight solution that withstands the rigours of the road.
The removal of old, failed sealant is often the most challenging part of the repair process. You must avoid using metal scrapers or abrasive pads on acrylic panes, as these will cause permanent surface scratches and compromise the optical clarity of the window. Use a plastic spatula or a dedicated non-marring sealant removal tool to lift the bulk of the old material. Once the majority is removed, use Isopropanol (IPA) on a lint-free cloth to dissolve any remaining microscopic residue. This ensures a grease-free surface that is chemically ready to accept the new adhesive. If any previous silicone residue remains, the new bond will likely fail within months.
Surface Preparation and Cleaning
Once the surface is clean, you must use the correct tools for adhesive delivery. For solvent cements, we recommend using a 2mm dosing tip. This precision nozzle allows for a controlled flow of liquid, which is essential when working with low-viscosity materials that can easily run onto the face of the window. To avoid air bubbles during a delamination repair, apply the solvent in a continuous, steady stream along the joint. If you stop and start the application, you risk trapping air pockets within the weld. These bubbles are not merely an aesthetic issue; they represent weak points in the structural bond that could fail under thermal stress.
Curing and Finishing
Clamping is a non-negotiable step for successful window bonding. Use spring clamps or G-clamps with soft protective pads to apply even pressure across the bond line whilst the adhesive cures. You should leave the clamps in place for at least three hours, though a full twenty-four hour cure is recommended before the caravan is moved. Managing cure times requires attention to the ambient temperature. An ideal environment is between 18 and 22 degrees Celsius. If you are working in colder conditions, the chemical reaction will slow significantly, and you must extend the clamping time accordingly.
If you accidentally apply excess adhesive, you should clean it whilst it is still in a liquid state. For solvent welds, use a clean, dry cloth to wick away excess liquid immediately to prevent it from marking the acrylic face. For polyurethane or silicone sealants, a smoothing tool dipped in a mild soapy solution can create a clean, professional bead. Perform a final inspection by checking for a consistent, unbroken seal around the entire perimeter. If you are unsure about the curing requirements for your specific environmental conditions, speak with our technical specialists for a confirmed application schedule.
If you require specific technical advice regarding your window repair project, please get in touch with our specialist team for guidance on product selection.
Securing a Professional Standard Caravan Window Repair
Performing a successful repair requires more than just a basic sealant; it demands a technical understanding of how different chemical agents interact with vehicle substrates. You now have the framework to distinguish between the molecular fusion required for delaminated panes and the flexible weatherproofing needed for perimeter frames. By prioritising meticulous surface preparation and verifying material compatibility, you can achieve a result that matches industrial standards. Precision at every stage ensures that your repair withstands the mechanical stresses of towing and the fluctuations of the British climate.
Selecting the correct caravan window seal adhesive is the most critical decision in this process. Our specialist caravan repair kits are designed to provide industrial grade performance, ensuring your vehicle remains watertight through years of environmental exposure. If you require technical assistance with your specific repair project please contact our specialist team for expert guidance. Our UK based technical support is available to help you navigate the complexities of chemical bonding, ensuring you have total confidence in your repair outcome. With the right materials and a methodical approach, you’ll restore your caravan with the precision of a seasoned professional.
Frequently Asked Questions
What is the best adhesive for caravan window delamination
WC105 Water Clear Solvent Cement is the preferred choice for structural delamination repairs. This product performs a solvent weld that fuses the two acrylic panes into a single unit. Unlike standard glues that sit on the surface, this caravan window seal adhesive creates a molecular bond that restores the window’s original integrity. It’s essential to choose a medium viscosity variant like WC105 to ensure the liquid fills the gap without running excessively.
Can I use standard superglue on my caravan windows
You shouldn’t use standard cyanoacrylate superglue on caravan windows. Most commercial superglues are incompatible with acrylic and Polyplastic, leading to chemical crazing or permanent cracking within the pane. Whilst we sell B2001 and other cyanoacrylates for specific industrial tasks, they’re unsuitable for large window surfaces. Instead, use a dedicated solvent cement or structural acrylic adhesive specifically formulated for the plastics used in caravan manufacturing to ensure a safe, clear finish.
How do I remove old window sealant from my caravan without damaging the paint
Use a plastic spatula or a dedicated non-marring tool to lift the bulk of the old sealant. You must avoid metal scrapers as they’ll inevitably scratch the vehicle skin or window surface. Once the majority is removed, apply Isopropanol (IPA) to a lint-free cloth to dissolve the remaining residue. This method effectively cleans the surface for a new caravan window seal adhesive application without compromising the paintwork or causing surface abrasion.
Is it better to use a sealant or an adhesive for a leaking window
The choice depends entirely on the location of the leak. If the water is entering through separated window panes, you require a structural adhesive like a solvent cement. If the leak is occurring between the window frame and the caravan body, a flexible polyurethane sealant is the correct solution. Adhesives provide rigid structural bonds, whereas sealants offer the flexibility needed to accommodate the thermal expansion and vibration of the caravan whilst in motion.
How long does caravan window adhesive take to cure fully
Most solvent cements reach significant handling strength within three hours of application. However, a full chemical cure typically requires twenty four hours in dry conditions before the window is subject to road stress or moisture. Factors such as ambient temperature and humidity will influence this timeline. If you’re working in temperatures below 15 degrees Celsius, you should expect the curing process to take longer and adjust your repair schedule accordingly.
What causes caravan windows to delaminate in the first place
Delamination is primarily caused by prolonged UV exposure and the stresses of thermal expansion. The bond between the inner and outer panes degrades over time as the materials expand and contract at different rates. Mechanical vibrations from road surfaces also contribute to the eventual fatigue of the original factory bond. Identifying fogging or condensation between the panes early allows you to perform a repair before the panes separate completely and risk detaching during transit.
Can I use a hot melt glue gun for caravan window repairs
A hot melt glue gun is not suitable for structural window repairs or perimeter sealing. Whilst we offer professional hot melt adhesive and guns for packaging and assembly, these products don’t provide the UV resistance or flexibility required for external caravan applications. The high temperatures can also warp or damage acrylic window panes. You should always use a cold-applied solvent cement or a dedicated polyurethane sealant to ensure a durable, weather-resistant bond.

Article by
Lucy Mackay
Lucy Mackay is a Director at Bondrite Adhesives Ltd, an ISO 9001-certified industrial supplier based in Loughborough. With a focus on customer-led solutions and technical reliability, Lucy manages the strategic direction of the business, which has been a staple of the UK adhesive industry since 2002.
Disclaimer
This article is intended for informational purposes only. Please ensure you seek expert advice or carry out your own research to confirm the information is suitable for your specific needs.
Related Industrial Adhesives & Sealants
If you liked this guide then you may also like the following: